
Avid readers of this blog may remember that one of my projects last year was to convert my favourite vinyl records to a digital format. It took me a while - in the end I converted around 660 tracks from about 120 different records (LPs, 12"s and 7"s, with a couple of 10"s for good measure!), which added up to over 40 hours worth of music.
I started the project sometime in mid-March last year and completed it sometime in mid-July, and having been listening to the resulting tracks on my laptop since then, I thought it was high time that I wrote up what I learned about the process. So here it is:
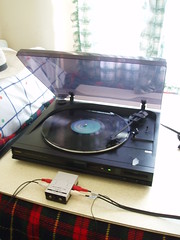
Hardware: I used my old Goodmans turntable (pictured above) hooked up to my old PC via a preamplifier unit. This set up seemed to work pretty well, although afterwards I wished that I had 1) invested in a new needle for the turntable, and 2) found a way to earth the turntable (to reduce the background hum on the recordings).
Software: my PC was running under Windows XP and I used Audacity (version 1.3.7) to capture and process the audio from the turntable arrangement:

As the PC is quite old I learned that it's sensible to close down all other programs and background processes (including screensavers) during the actual recordings - if the load on the system got too high then the resulting recordings sometimes ended up with skips that weren't on the original record.
Recording process: the procedure that I developed for each record was something like this:
- Fix the recording level in Audacity: the idea is to set the input volume level as high as possible whilst avoiding "clipping" of the recorded waveform. I'd do this by trial and error, by making test recordings from parts of the record that I thought were likely to be the loudest. Once I found the optimum level I made a note of it, in case I needed to re-record later on if I discovered a problem during playback.
- Clean the needle and the record: to reduce surface noise and the likelihood of pops, crackles and skips.
- Record each side of the disc in a single take: while the record was playing I would listen for "defects" such as pops/crackles, skips, drop-outs, making a note of the timecode for each as I heard it. (A comfortable pair of headphones is recommended if you're doing more than a few recordings.)
- Click removal tool: Audacity's Click removal tool (under the Effects menu) sometimes worked for me when trying to remove pops and crackles, but I found it a bit hit-and-miss to be honest.
- De-amplification: essentially highlighting the waveform around a pop and then applying amplification to e.g. -8db, using the Amplify tool (also under the Effects menu).
- Copy-and-paste: very fiddly technique but could be quite effective, using the options under the Edit menu I would copy a bit of the waveform from elsewhere in the track and then use this to replace the part with the defect.
Once the defects had been dealt with I applied RIAA equalisation (under the Effects menu) to the whole track. At this point I sometimes also applied amplification to the whole thing, if it turned out that I'd chosen a recording level that was a bit too quiet.
Check the recording & split into tracks: the final part of the ripping process was to check each recording by playing it back through Audacity (to ensure that it was complete and that there weren't any unexpected skips which might necessitate a re-recording), and then to break it up into individual tracks. To do this I added "labels" to the project to mark the start of each track, and then used the Export multiple option to automatically save them as WAV files.
(An aside: WAV files are uncompressed so they are big! But because it's "loss-less", I reasoned that this would be a good "archival" format if I wanted to play around some more with a track later on. I've since wondered about converting them to FLAC, which would save disk space whilst preserving the data.)
Import into iTunes: since I use iTunes to manage my music for "everyday use", I used it to generate compressed AAC-format versions for each track as it was added to the iTunes library:
- In Edit Preferences->Advanced tab, deselect "Copy files to iTunes Music when adding to library".
- Select the files to add to the library using File->Add Folder option (n.b. drag and drop also works).
- Once the WAV files have been added, right-click on the first imported track in iTunes, select Update info and add data about the artist, album name, number of tracks and so on. (Note that it's also possible to select multiple tracks and add data for several at once.)
- Select the imported tracks, right-click on them and select Create AAC version from the menu. (The resulting AAC tracks will contain the artist and album data added in the previous step.)
- At the end, the library will contain two versions of each track - the original WAV file and the AAC version - so I went through and deleted the WAV versions from iTunes (note that this doesn't delete the original files, just the references to them).

3 comments:
What a huge amt of work!
Ha ha about having a tag for "bias tape".
and is that tag cloud new?
Thanks! I think I added the tag cloud a few weeks ago, when I retroactively tagged the earlier postings. Are you going to get one?
Post a Comment